

Plinky is an 8 voice polyphonic touch synthesiser that specialises in fragile, melancholic sounds.
Think of it as an 8 stringed instrument, played by touching the 64 main pads, which are arranged in 8 vertical monophonic strips or strings. You can play Plinky straight away with those 64 main pads.
Each of the 8 strings has:
- Up to 4 oscillators (pulse, supersaw or wavetable) or sampler grains, detuned by the movements of your finger.
- A white noise generator
- Two ADSR envelopes
- A resonant 2-pole low-pass gate.
- Distortion / saturation
The 8 shift keys (blue LEDs) are used in conjunction with the main pads to select parameters, presets, sequencer patterns, and samples.
Plinky supports 4 external CV modulation sources, called A B X Y, each with its own LFO. A and B also have dedicated physical offset knobs, located to the left of the screen. When changing parameters you can use the endless encoder to the right of the screen to fine tune the parameter settings. Clicking the encoder also resets the current parameter.
Plinky also has global Delay, Reverb, High Pass Filter, Limiter and Saturation units along with a simple Mixer (for audio inputs), Arpeggiator, Sequencer and Sampler.
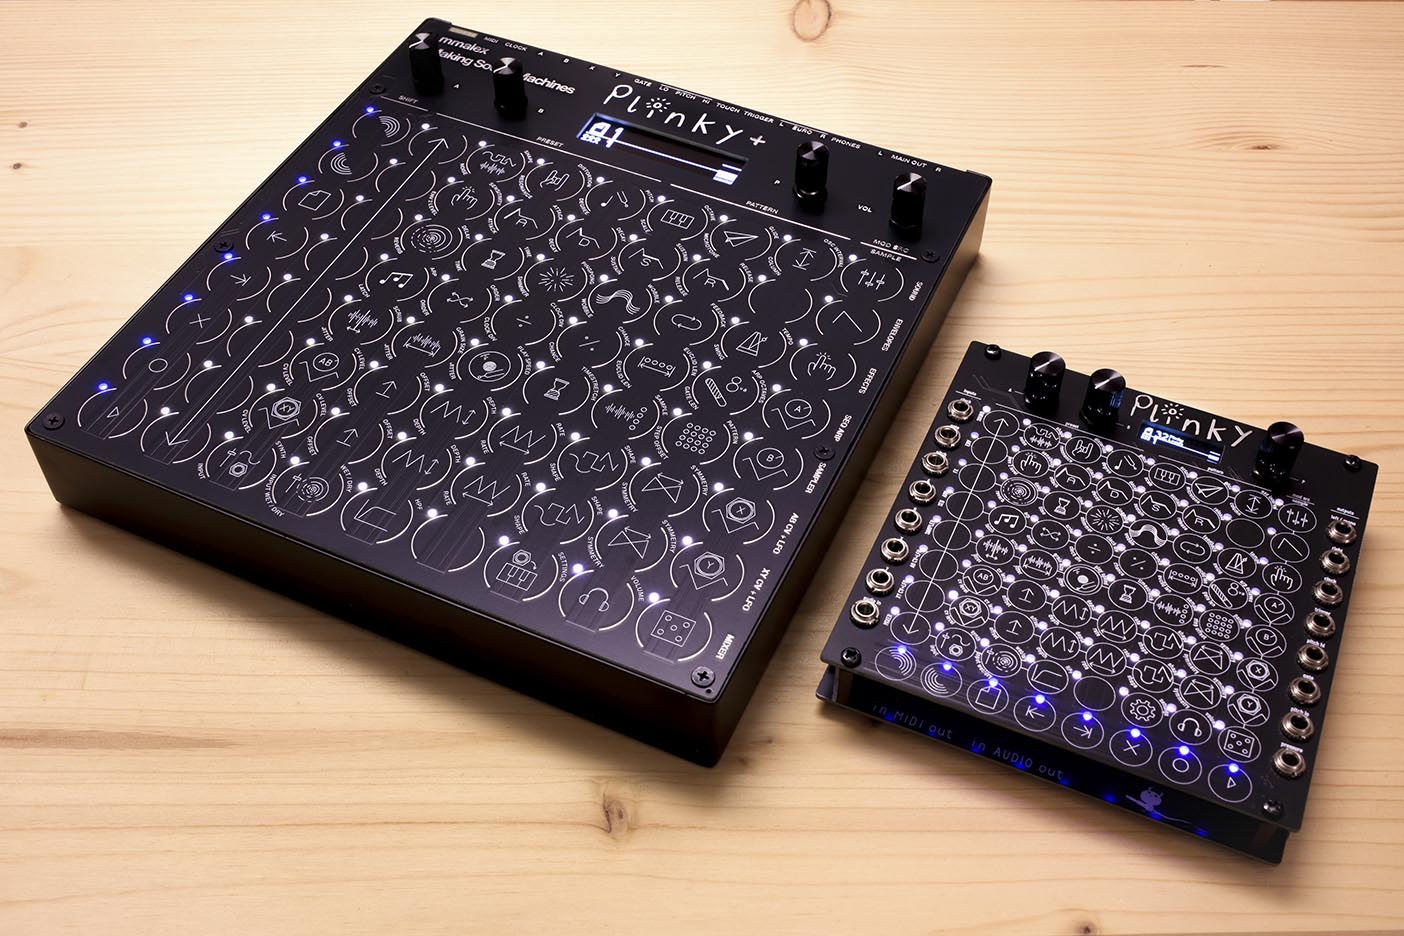
Plinky+ – what's new?
Plinky+ is an iteration on the original Plinky DIY Kit, designed by mmalex, upgraded in a collaborative effort between mmalex and Making Sound Machines.
Plinky+ is firmware-compatible with the original Plinky, sharing the same audio engine and beautiful sound that make it a favourite among its users. Its hardware though has been greatly improved.
Plus-sized play surface
Relegating all jacks and connectivity to the back allows for a 22 mm spacing per touch strip, similar to the spacing of a keyboard. This makes playing chords on the touch surface easier, and playing pitch and pressure more accurate. The Shift row has been rearranged from the bottom to the left, allowing for a length of 16 cm per strip.
Bigger Display
Plinky+ has been upgraded with a much larger OLED display in crisp white on black, making it easier to read from a distance.
Metal Enclosure
Plinky+ comes in a rugged black powder-coated metal enclosure. The instrument weighs just under 1kg, sitting on your desktop without moving around while playing.
Clear Dust Cover
Both the assembled Plinky+ and the DIY Kit come with a custom translucent PET-G lid to protect from dust and save the deck.
All the I/O
Plinky+ has all the connectivity of its little sibling, with the additional A B X Y CV-outs from the original Expander built in. All input and output jacks have been moved to the back.
Better sound
The analogue output stage for Line, Euro and Headphone stereo outputs has been reworked to deliver a better sound. The new volume knob lets you set the volume directly from the front panel. The main out has been upgraded to symmetric 6.3mm jacks to make the connection with your other audio gear more robust.
Printed Manual
Both the assembled Plinky+ and the DIY Kit come with a 48 page printed user manual.
Battery-operated (optional)
While Plinky+ does not come with a built-in battery, it has the circuitry and a connector that lets you retrofit a battery pack.
Assembled or Solderless DIY Kit
Plinky+ comes fully assembled or as a DIY Kit. The DIY Kit does not require soldering and contains all the parts you need to assemble the synth. You need to bring your own tools like a screwdriver, but other than that it's an easy assembly. To get an impression of the build process, check the build guide.
The Quickest Start
Whether you are completely new to Plinky, or just looking for a quick refresher, here is a 10 minute guide to playing Plinky. If your Plinky comes fresh out of the box, you should calibrate it, then return here.
You can play anywhere on the surface
except for these pads - they are reserved for the SHIFT functions.


Connect headphones to the 3.5 mm Phones out.
On Plinky, the headphone outputs are located next to the USB-C jack, on the right side. You can also find a pair of Eurorack level outputs on the top right of the front panel.
On Plinky+, the headphone out is on the back panel, bottom row. Or connect a pair of speakers or your soundcard to the symmetric L R Main out. Then dial in the volume with the knob.
Switch to another Scale
It's easy to switch to another scale.
hold  tap
tap
Hold SHIFT BOTTOM and tap SCALE.
Scroll up with the Encoder to pick a scale.
Tap SHIFT BOTTOM again to exit Shift mode.
Scale will remain assigned to the Encoder as the last thing you edited.
Change the Sound
hold  tap
tap
Hold SHIFT TOP and tap SHAPE. Slide your finger on the Arrow column to change the waveshape, or turn the Encoder. While in Shift mode you can still play everywhere but the Shift pads and Arrow column.
Tap SHIFT TOP again to exit Shift mode. Waveshape will remain assigned the Encoder.
Explore Poly Touch
hold  tap
tap  tap
tap
Hold SHIFT BOTTOM, then NOISE. With SHIFT BOTTOM held, tap PRESSURE on the right, from the MOD SRC column. Use the Encoder and turn it up just a bit, to about 15%. Tap SHIFT BOTTOM again to exit Shift mode.
You have assigned how hard you press to the amount of noise that gets mixed into the voice. Play two or more notes, and alternate how hard you press on the string. Each one will respond individually.
This is the way you assign any type of modulation on Plinky.
Play with Microtones
hold  tap
tap
Hold SHIFT BOTTOM and tap MICROTONE. Turn the encoder and set this to 100%. This controls to what degree each touchstrip is quantized to scale. Tap SHIFT BOTTOM again to exit Shift mode.
Glide your finger up a column and the voice will play a continuous sweep. The center of each pad is still on scale so you can glide into chords from above and below.
A great setting to play in scale and still do vibrato is around 25% - 50%. Or you can go for a Theremin sound with a setting at 100%.
So Random
hold tap 
Hold SHIFT TOP, then OCTAVE. Use the Encoder to set the base value to -1.0. With SHIFT TOP held, tap RANDOM on the bottom right, from the MOD SRC column. Use the Encoder and turn it to 3.0. Tap SHIFT TOP again to exit Shift mode.
Tap the same pad on the play surface a couple of times. With each tap, Plinky will roll the dice and you get a random octave, ranging from one oct below to two above the original note.
Remove that Modulation
hold tap tap
Hold SHIFT BOTTOM, then NOISE again. With SHIFT BOTTOM held, tap PRESSURE. Click the Encoder to reset the Modulation to 0%. The noise-to-pressure mapping is gone. Tap SHIFT BOTTOM again to exit Shift mode.
Play the Arp
hold  tap
tap
Hold SHIFT TOP and tap ARP. Tap SHIFT TOP again to exit Shift mode. Hold two or more pads and enjoy Plinky arpeggiating away! If you still have octave randomness enabled, the octaves will jump with every note.
Try all the Sounds
tap To switch presets, tap the PRESET pad. Then tap any of the 32 pads the columns labelled PRESET at the top.
Tap PRESET again to exit and play the sound.
Plinky can hold 32 Presets at a time. You can find more preset banks on the Presets page.
Video: What Note am I even playing?
Nathan Plante has made a fantastic video to help you navigate the pitches on the play surface:
Thank you Nathan for the lovely video!
Quick Start Guide
Congratulations! If you read this manual, you either have a pre-assembled Plinky in front of you, or you have successfully built your Plinky from a DIY kit. Welcome to the Plinky user community! We hope you make and share lots of beautiful music – or pure plain filth if you're into that.
Powering Plinky
To power Plinky or Plinky+, connect them to a USB power supply. Either draws around 400 mA from a 5V supply, so any USB phone charger, including older ones with a USB A port, should suffice.
On the original Plinky, you can use either one of the USB connectors on the front or the back (but again, don't use both at the same time!). The original Plinky can also be powered from a Eurorack power supply. Note that your supply needs a 5V bus.
Plinky+ has a dedicated power button. Connect the USB power supply and push the on/off button on the back panel to power it on. While Plinky+ does not come with a built-in battery, it has the circuitry and a connector that lets you retrofit a battery pack.
Calibration
At first power up, (or when you wiggle knob A during the power up,) Plinky will start in Calibration mode. What this does is map the exact size and positioning of your fingers to where it will register a pad being played. For example if you play Plinky from an angle, you will touch the faceplate slightly differently. Calibration compensates for this.
One white LED in each column will light up. Touch this in the center and the next one will light up. Touch that one in the center, and so on, making sure that the pressure is consistent on each pad.If your finger lands a bit off center from a pad, just slide it into place without lifting it off and leave it for a moment. Do this until all white LEDs have been calibrated and do the same for the Blue LEDs (the shift keys). You are now done.
TIP: if you have large fingers, try calibrating with your little finger! Some people have found that this leads to more responsive playing after calibration.
If you make a mistake during the calibration, just unplug and replug the USB cable. If you ever want to re-calibrate, (for example, because you've moved Plinky into or out of your Eurorack, or even if you've moved it around,) just wiggle knob A during power up.
We've found that changing the power supply you use, or the case that Plinky is in, can affect calibration. If you find that Plinky isn't responding correctly, it's definitely worth re-calibrating. We recommend trying a few different power supplys, as different supplies seem to lead to quite different sensitivities.
Connect your Headphones or Speakers
Plinky
Plinky has two headphone outputs, on the front side and the back side. For each one, it is located to the right of the USB.
Phones Top: a 3.5 mm TRS stereo headphone jack, on the top, right of the USB
Phones Bottom: a 3.5 mm TRS stereo headphone jack, on the bottom, right of the USB
Euro L/R: a 3.5 mm TS stereo pair, Eurorack level, the first two jacks top right on the panel.
The jack input on the left is the audio input (for effect processing or sampling).
Plinky+
Plinky+ has three audio outputs at the back, all of which can be used simultaneously. Set the gain using the volume knob on the front panel.
Main L/R: a symmetrical 6.3 mm TRS stereo pair
Euro L/R: a 3.5 mm TS stereo pair, Eurorack level
Phones: a 3.5 mm TRS stereo headphone jack
The two audio inputs, both 3.5 mm TRS stereo jacks, are meant for effect processing or sampling.
TIP: Plinky / Plinky+ has an analog saturation circuit. While the line inputs are designed for a stereo line level signal, you can actually run full eurorack level 'hot' signals into Plinky here, and get a really crunchy overdriven sound. Voilà! you can use Plinky as a saturation/fuzz box. The stereo Eurorack input jack has a lower gain, and will saturate less.
You are now ready to Plink.
Play Plinky!
Each of the center pads plays a note. Plinky is either playing a blank preset, which is a 4 voice unison Saw wave for each of the 8 'strings', or you are playing one of the factory presets. Plinky can play 8 voices polyphony. Enjoy!
Changing the Sound
hold  tap
tap
To enter parameter edit mode, hold down a shift button on the top left, then select one of the icon pads. The LEDs light up while you have your fingers held down on the pads. Then release all your fingers. While in parameter edit mode, both the shift button and the icon pads' LEDs will pulse.
The screen always shows the device you are editing in the upper half and the parameter in the lower half. The pads with blue instead of white LEDs are the shift / transport / mode buttons - you can find them the bottom row on Plinky and the leftmost column on Plinky+.
Let's use this workflow to add some Delay to your sound.
hold tap
Tap and hold SHIFT TOP, the primary parameter editing button. Tap the DELAY pad in the third row. This is the send level to the Delay. Slide your finger upwards on the Arrow column of pads, which now acts as a slider, to increase the amount of Delay. To hear this, play any of the pads other than the Shift pads or Arrow column.
Play and tweak. Alternatively, you can twist the encoder to adjust the value finely. Click the encoder to reset the value to default. Tap the SHIFT TOP button to return to regular play mode, where you can use the Arrow column for playing notes. This is the basic workflow for creating patches on Plinky!
Adding Modulation
hold  tap
tap  tap
tap
Adding modulation has a similar workflow. You tap and hold down a SHIFT button, and select a parameter to enter parameter edit mode like before, but now you keep on holding down the SHIFT button and tap one of the mod sources (the right most column of pads).


Let’s use the physical knob at the top left of Plinky to adjust overdrive.
hold tap tap
Hold Down SHIFT TOP again, then tap drive (in the first row) to select distortion. While still holding down SHIFT TOP, tap the MODULATOR A pad on the right column. What you are saying is, 'I want to link modulation source A to the parameter distortion'.
Now you'll see three blinking LEDs: the shift button, the parameter pad and the modulation pad. The screen still shows the parameter you are editing in the lower half, but the upper half now shows the modulation source instead of the sound device.
You have now linked the modulation source, but you also have to tell Plinky how much that modulation should impact the distortion. You do this with the Arrow slider, or the encoder for fine adjustments. In this case we want the knob to control the full distortion range, so we turn it all the way up with the slider.
Turning the knob fully counter clockwise adds 0% overdrive, turning it all the way clockwise adds 100% overdrive. Now, the physical knob at the top left of Plinky will control overdrive. To return to play mode, tap SHIFT TOP.
That’s as complex as it gets! You now know everything you need to know to play, edit patches and modulate. Enjoy! Details follow.
Removing Modulation
To remove a parameter's modulation, simply repeat the steps as described above, and turn modulation amount back to 0% (clicking the encoder is perfect for this).
 To see which modulation sources are linked to a parameter, select it and check which of the modulator LEDs light up. Use MODULATOR Base to switch between 'base value' and 'modulation amount'
Plinky hardware
Let’s take a look at Plinky’s inputs and outputs. They are located on the top and bottom edges, as well as the two columns of jacks on the left and right of the front panel.
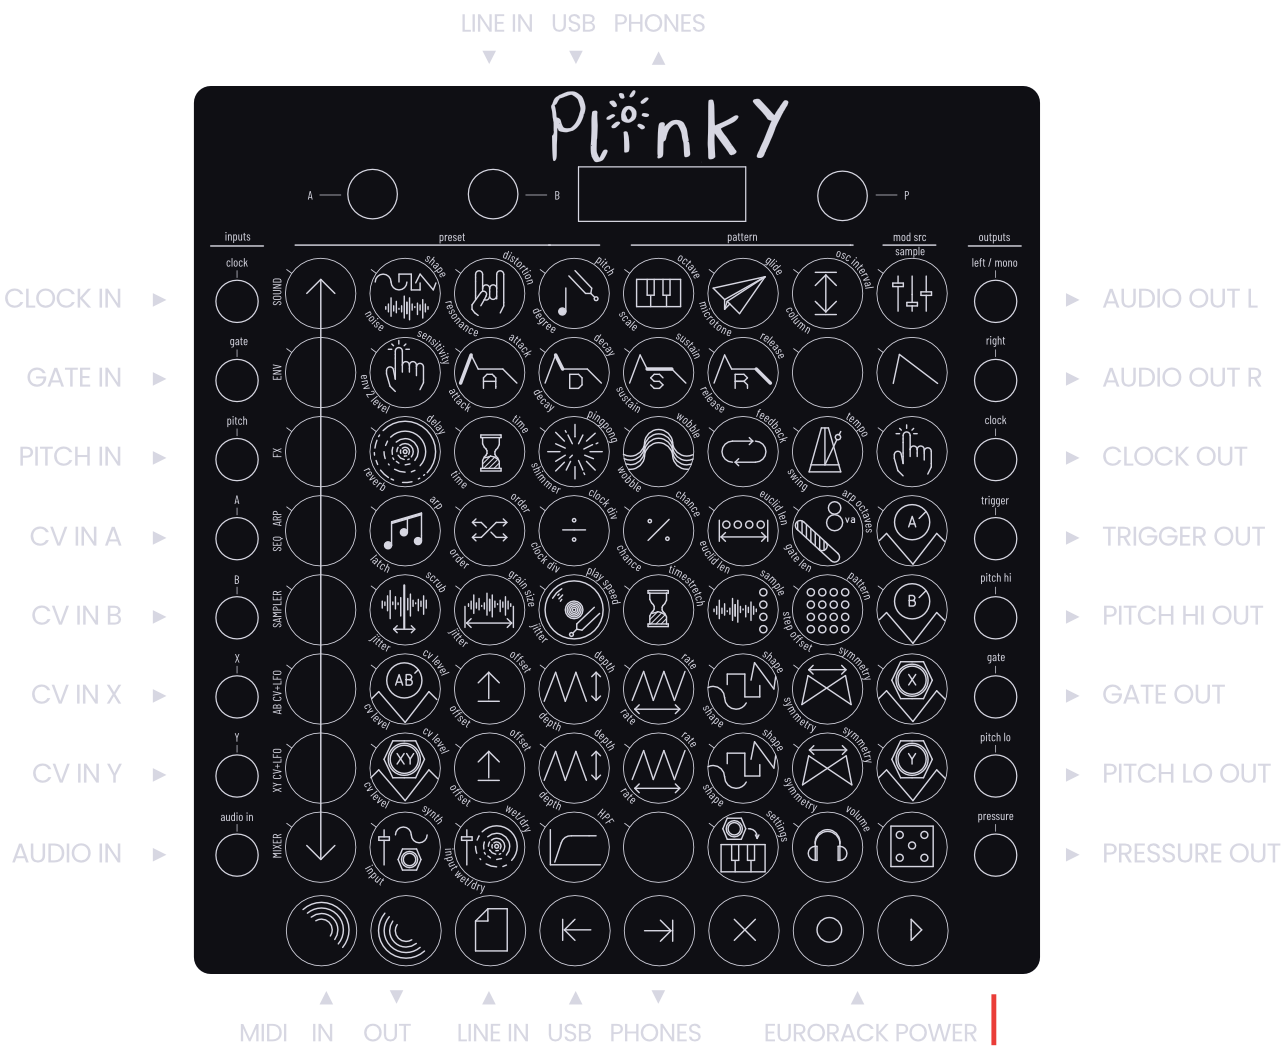
The inputs and outputs on the top and bottom edges have identical functions, and both can be used simultaneously. On each side you find:
Audio in (Line level stereo)
A TRS 3.5 mm audio jack. Useful for two things. Plinky's sampler can sample incoming audio into 8 slots of 65 seconds each. Additionally, Plinky can act as a mixer with effects (Reverb and Delay), where each of Plinky’s audio inputs are mixed with Plinky’s internal audio. The individual inputs are mixed at unity gain, but the levels of the summed inputs and the internal sounds can be set separately.
Remember, if you have Plinky V2 (with the blue main board) you can and absolutely should try running Eurorack signals through Line level inputs to enloy that crunchy analog saturation.
USB
The USB jack is either USB Micro-b on v1/v2, or USB-C on v3. It can power Plinky. Warning -- do not attempt to power Plinky with both USB and Eurorack simultaneously.
Audio out (Line level stereo)
A TRS 3.5 mm audio jack that outputs the mixed output at line level.
TRS MIDI Out (V3 hardware only)
TRS 3.5 mm jack - MIDI Type-A
TRS MIDI In (V3 hardware only)
TRS 3.5 mm jack - autosensing - accepts both MIDI Type-A and Type-B
The input circuit used is the LPZW.modules Autocrossover circuit. Thank you Kay!
Columns of Jacks
The column of jacks on the left of the front panel are all inputs. The column of jacks on the right are all outputs. Their individual functions are described in detail in the Eurorack chapter. Here is a quick overview:
Eurorack Inputs (Left column)
- Clock Input - 16th note / 4 PPQN clock input
- Gate Input - scales the openness of all low pass gates.
- Pitch Input - V/oct CV input for transposing any note played by hand, Arpeggiator or Sequencer
- A, B, X, Y Inputs - Modulation (A, B, X, Y) CV inputs
Eurorack Outputs (Right column)
- Audio Out L / R - 3.5 mm TS stereo pair, Eurorack level.
- Clock Output - A 16th note / 4 PPQN clock output.
- Trigger Output - Trigger out for each note played by hand, Arpeggiator or Sequencer
- Pitch Hi / Lo Output - V/oct CV out. Hi is the pitch of the highest note, and Lo of the lowest note being played.
- Gate Output - A Gate signal. As long as one of the pads is being touched, a 5V signal is generated.
- Pressure Output - outputs the highest amount of pressure that is currently being put on either of the strings
Please read the Eurorack and CV chapter for more details.
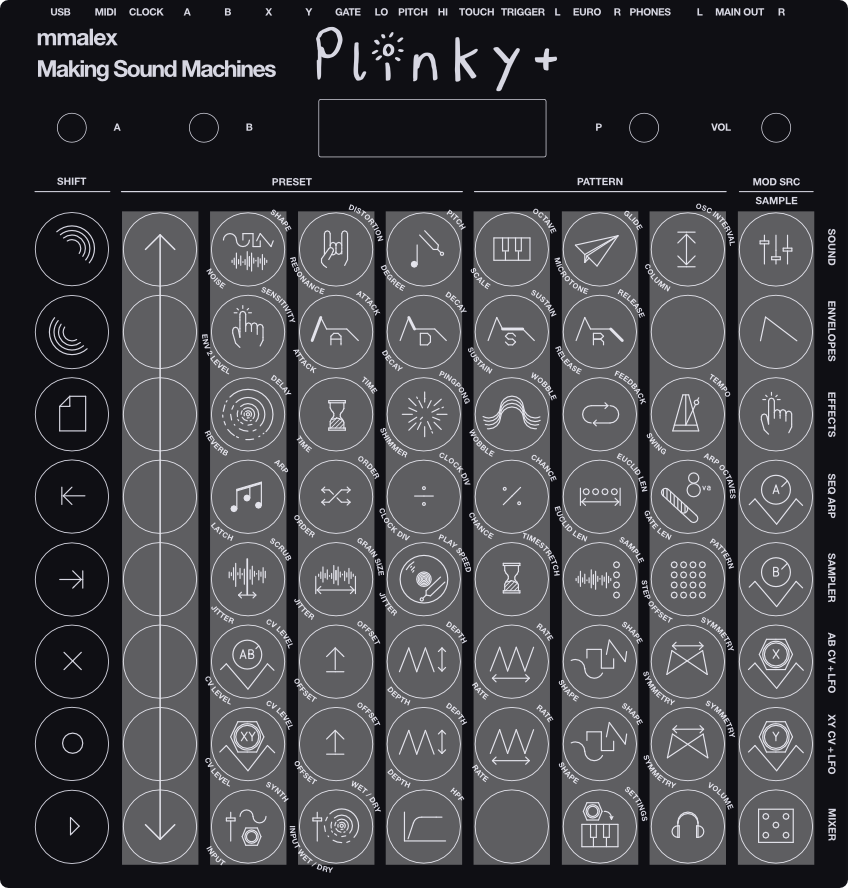
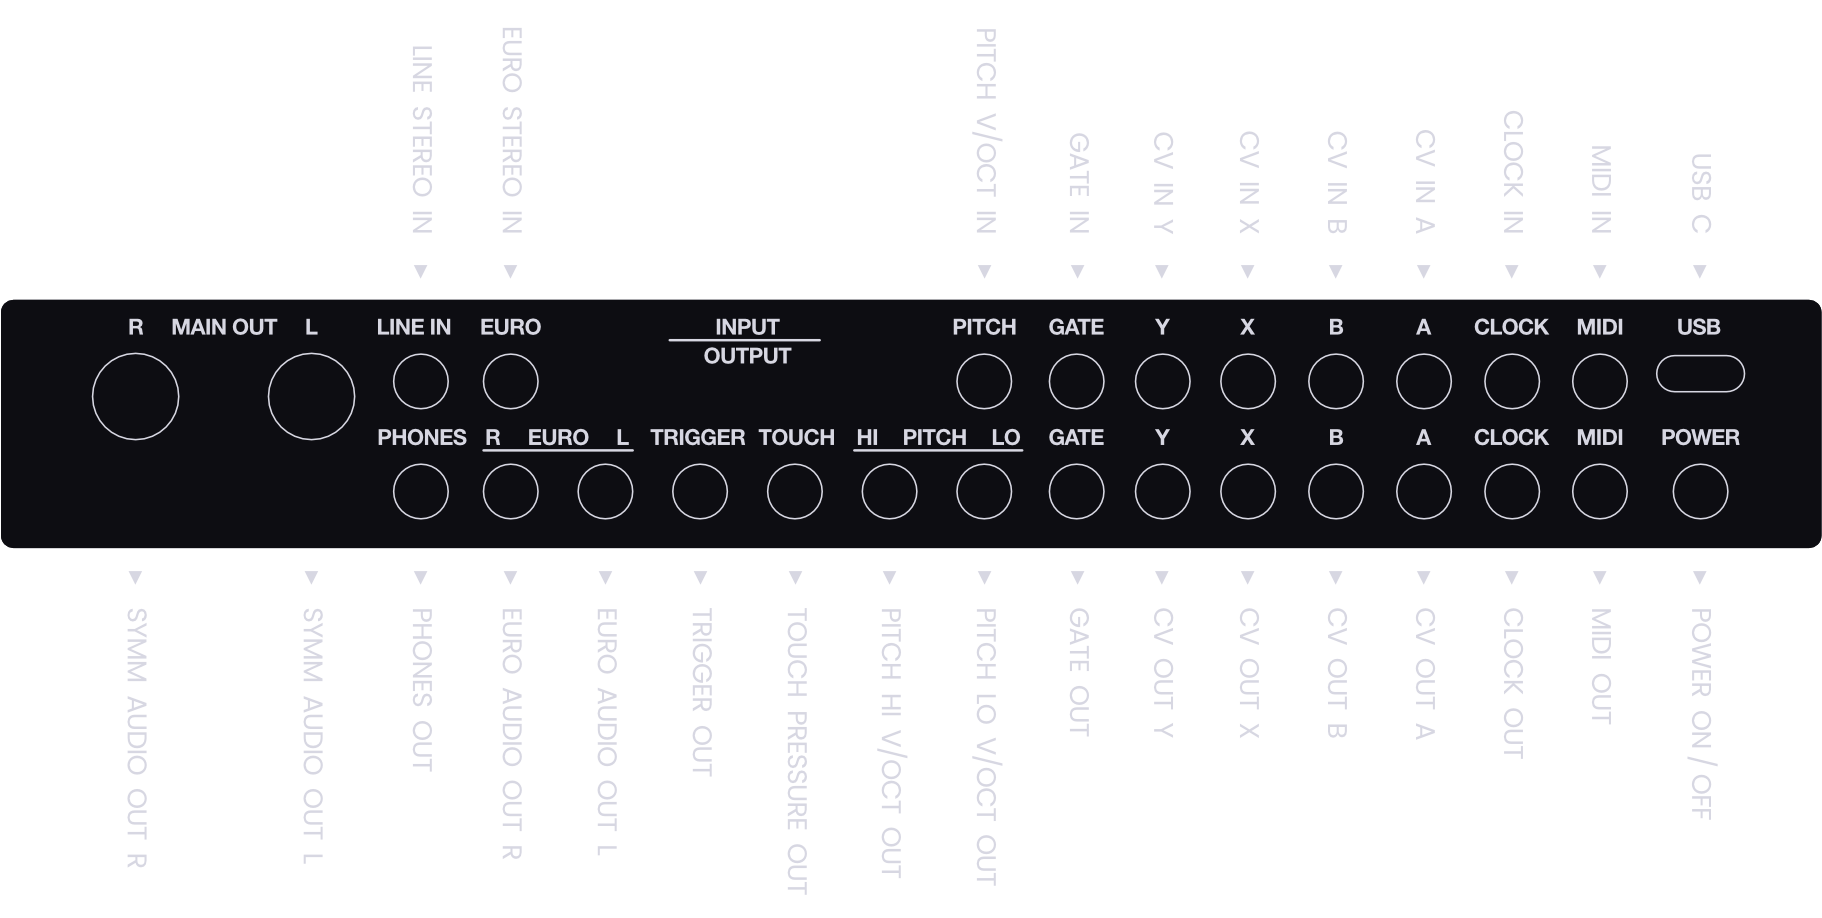
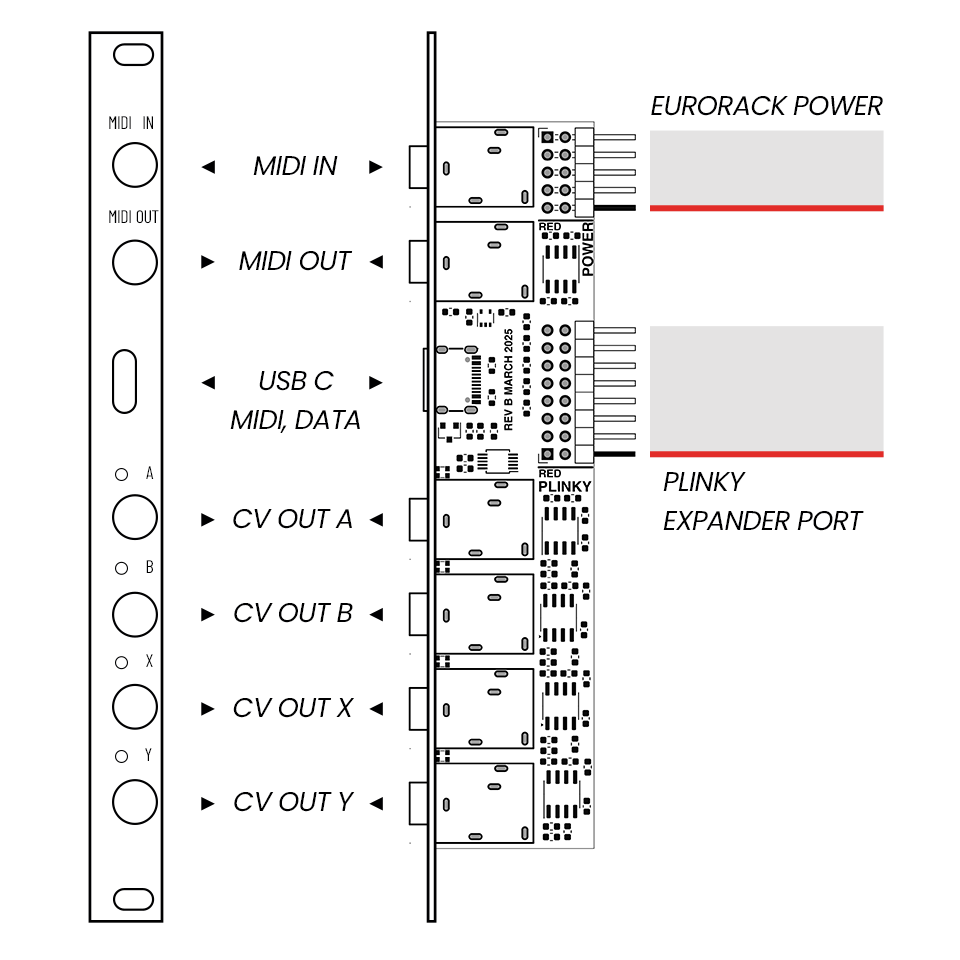
Plinky+ hardware
Plinky+ has all the connectivity of its little sibling, with the additional A B X Y CV-outs from the Expander built in. All input and output jacks have been moved to the back panel.
Audio Inputs
The two audio inputs, both 3.5 mm TRS stereo jacks, are meant for effect processing or sampling. The audio inputs have an analog saturation circuit.
- Line in: a 3.5 mm TRS stereo jack, at Line level
- Euro in: a 3.5 mm TRS stereo jack, Eurorack level
While the Line inputs are designed for stereo line level inputs, you can actually run full eurorack level 'hot' signals into Plinky+ here, and get a really crunchy overdriven sound. The Eurorack audio input jack has a lower gain, and will saturate less.
Audio Outputs
Plinky+ has three audio outputs at the back, all of which can be used simultaneously.
- Main L/R: a symmetrical 6.3 mm TRS stereo pair
- Euro L/R: a 3.5 mm TS stereo pair, Eurorack level
- Phones: a 3.5 mm TRS stereo headphone jack
Set the gain using the volume knob on the front panel. Note that the volume knob is an analogue control in the signal path, and not a digital control. This allows for the optimal use of the dynamic range of Plinky+'s audio codec.
Eurorack Inputs (Top row)
- Pitch Input - V/oct CV input for transposing any note played by hand, Arpeggiator or Sequencer
- Gate Input - scales the openness of all low pass gates.
- A, B, X, Y Inputs - Modulation (A, B, X, Y) CV inputs
- Clock Input - 16th note / 4 PPQN clock input
Eurorack Outputs (Bottom row)
- Trigger Output - Trigger out for each note played by hand, Arpeggiator or Sequencer
- Touch Output - outputs the highest amount of pressure that is currently being put on either of the strings
- Pitch Hi / Lo Output - V/oct CV out. Hi is the pitch of the highest note, and Lo of the lowest note being played.
- Gate Output - A Gate signal. As long as one of the pads is being touched, a 5V signal is generated.
- A, B, X, Y Outputs - sends out the A B X Y modulation as -5V to 5V CV.
- Clock Output - A 16th note / 4 PPQN clock output.
Please read the Eurorack and CV chapter for more details.
TRS MIDI In / Out
Plinky+ has polyphonic MIDI Input and Output.
- The TRS MIDI input is located next to the USB jack and can be either Type A or B.
- The TRS MIDI output is next to the power switch and is TRS MIDI Type A (Korg).
The input circuit used is the LPZW.modules Autocrossover circuit. Thank you Kay!
Plinky sends polyphonic aftertouch, as well as pressure and position as a MIDI Control Changes (CC) for each of its strings.
Plinky responds to incoming notes, as well as MIDI Control Changes (CC). These allow you to edit a subset of Plinky‘s parameters via MIDI in real time.
Refer to the MIDI chapter of this manual for details.
USB
The USB port on Plinky serves multiple purposes:
Power
The USB port serves as the primary power source for Plinky and Plinky+. Connect it to a USB power supply. Either instrument draws around 400 mA from a 5V supply, so any USB phone charger, including older ones with a USB A port, should suffice.
The exact kind of USB socket depends on the Plinky version you own:
- Plinky V1 (green PCB) - USB Micro B
- Plinky V2 (blue PCB) - USB Micro B
- Plinky V3 (black PCB) - USB C
- Plinky+ (black PCB) - USB C
On Plinky+, you need to push the Power switch under the USB port to power it on or off.
USB MIDI
USB is also used for MIDI in- and output.
Plinky+ acts as a client, so you need to connect it to your computer or another MIDI host to use the port.
Patch Editor
The USB-C acts as a webserial port for the browser-based patch editor.
Download + Tutorials plinkysynth.com/docs/editors
Online patch editor plinkysynth.github.io/editor
Updates
USB is used to update firmware, presets and wavetables in UF2 mode (tunnel-of-lights).
- Firmware files are in the form of:
CURRENT.UF2 - Wavetable files are in the form of:
WAVETAB.UF2 - Preset files are in the form of:
PRESETS.UF2
When copying over any of these, make sure the filename matches.
Firmware updates plinkysynth.com/firmware
Presets and sounds plinkysynth.com/presets
Presets and sounds plinkysynth.com/wavetables
Battery Charge (Plinky+)
The built-in circuit behind the USB C port on Plinky supports charging a rechargeable Battery Pack. If you have a 3.7V Lithium Ion pack with charge protection connected to the JST connector on Plinky+'s main board, you can use the USB-C port to charge the Battery with a 1A rate.
The USB window will glow red while the Battery is charging, and switches to blue once fully charged.
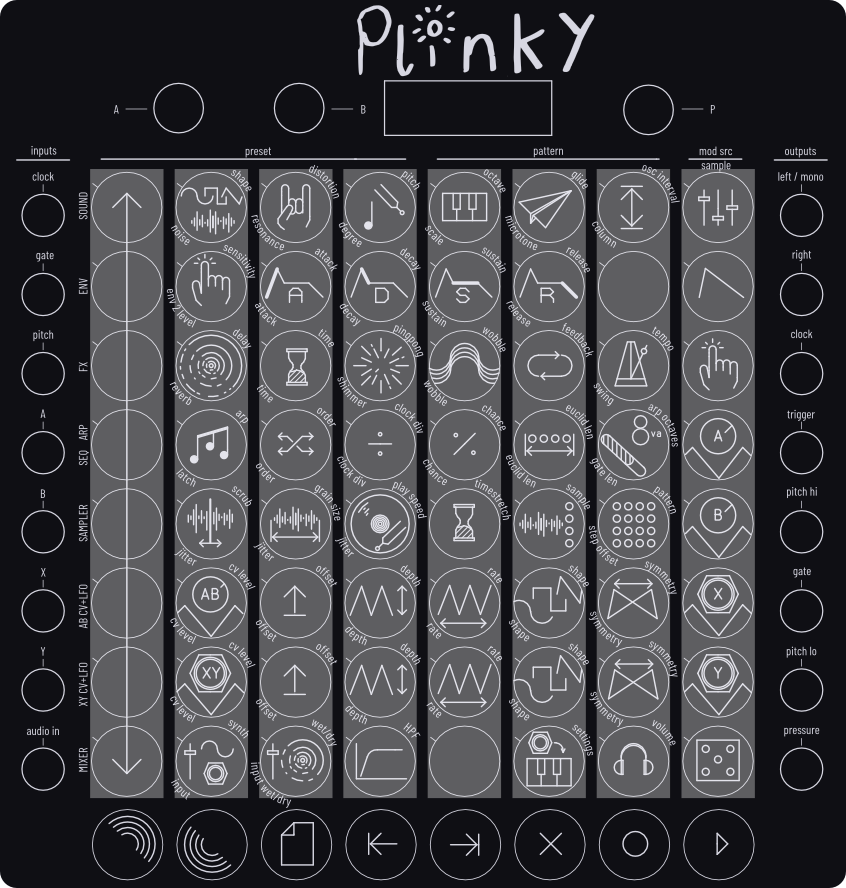
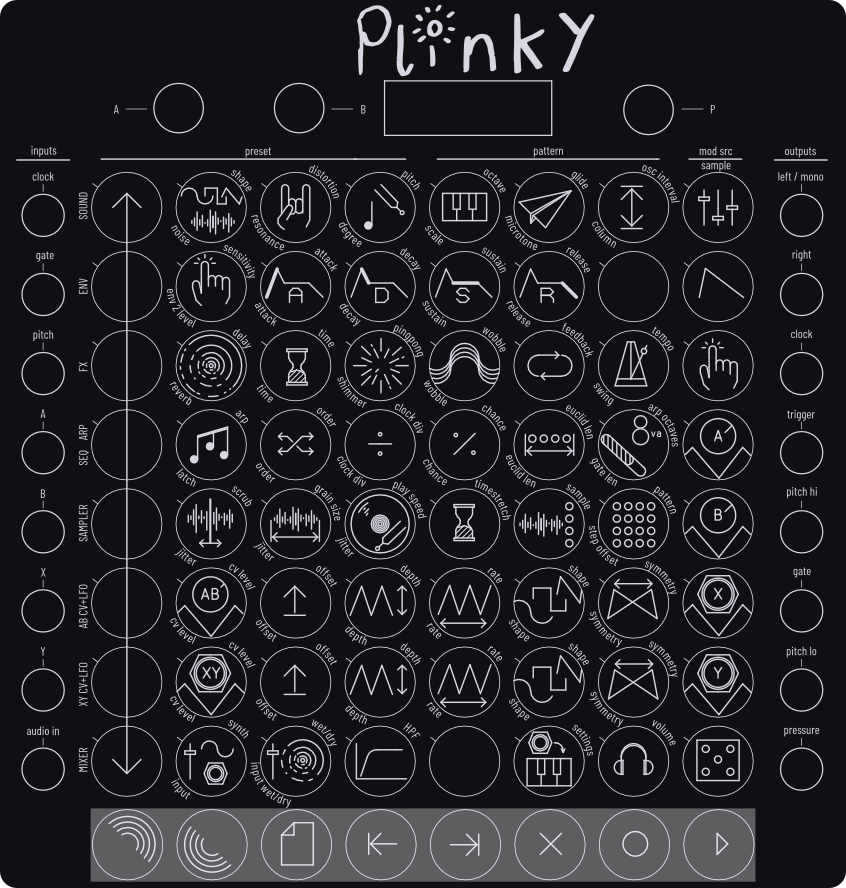
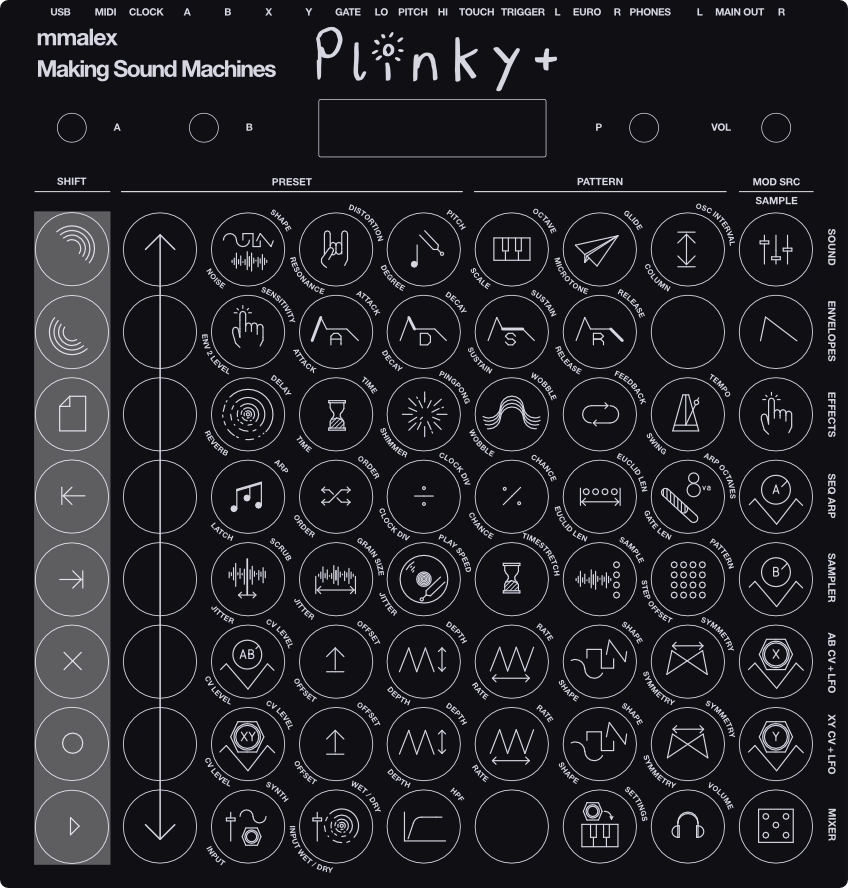
Main Interface
Plinky is built around 64 playable ‘pads’. Actually they are not really pads, they are zones on a vertical strip. By calibrating Plinky’s touch strips, we make them function as pads.
Knobs A and B
These two knobs act as offsets for modulator A and B respectively. Modulator A is the sum of LFO A, CV input A and the offset of the button. These modulators can be assigned to all the parameters.
Encoder
The push encoder is used to set parameter values. Values can often be negative and positive, where different types of units correspond to the positive or negative values (eg. in the shape parameter, negative values modulate the Pulsewidth of a pulse wave, at 0 it is a supersaw, when positive it is a wavetable).
The encoder remains tied to the parameter that was last edited, even when Plinky is not in parameter edit mode.
When pushed, the encoder will snap the parameter value back to 0. This is useful to remove modulation from a parameter. A long push on the encoder clears the modulation.
Press and hold the push encoder down while plugging Plinky into power and it will enter the "tunnel of lights" mode where you can update the firmware or change presets. See https://plinkysynth.com/presets for details.
To change the wavetable, see plinkysynth.com/wavetables.
Volume Knob (Plinky+)
Plinky+ has three audio outputs at the back, all of which can be used simultaneously. The volume knob on the front panel sets the level for all three.
hold  tap
tap
On the original Plinky, to set the volume, hold SHIFT TOP and tap VOLUME. Use the Encoder or Arrow column to dial in the gain. This sets the level of the final output stage for the headphone out. Tap SHIFT TOP again to exit shift mode.
Screen
Plinky's screen shows a lot of useful information. There are three modes, and they each have their own interface on the screen: Play mode, Parameter Edit mode, and Sampler mode.
Play mode
The screen shows the last note played on the top left. The bottom left shows the current Arp / Sequencer pattern. To the right of it, we see whether a sample is selected, and if so, which one. The center shows a nice big waveform of what’s being played through the Mixer stage. On the right side, a narrow bar shows the current pressure (max from each of the strings) that is being applied to the pads. Also on the right, you see 4 small visualisations of Modulator / LFO A, B, X and Y.
Sampler Mode
In Sampler mode you will see a large visualisation of the sample with vertical bars representing one of the 8 slice points. A small number to the right of this bar tells you which slide it is.
On the bottom left we see the mode the sampler is in (tape/pitch). When in pitch mode, we see the base note of the current slide. On the bottom right we see the sampler playback mode (all, loop, loop all).
Parameter edit mode
Top left shows the device you are currently editing (Sound, Envelope, Delay, Reverb, Arp, Sequencer, A, B, X, Y, Sampler, Mixer, System). Bottom left shows which parameter of the current device is being edited.
On the right we still see the pressure bar and the modulators. In the center we see one or two parameter values. In the upper half of the screen we see a big number, which is the current actual value of the parameter. When no modulation is applied, you will only see the big value, because the the base value and the total is equal, which you set with the slider or the encoder.
When modulation is applied, you will see 2 numbers. The small number in the lower half of the screen is the base value of the preset, the large number in the upper half is the sum of the base values and all modulation. This means that the base value is a static number, while the current value will change with the modulation (for example, an LFO). The small value is the one you can set with the slider/encoder, and the large value is the result of this.
Shift Keys
The pads with blue LEDs are shift and transport controls. You can find them the bottom row on Plinky and the leftmost column on Plinky+.
Shift Top and Shift Bottom
Edit Mode The first two shift buttons are the most important: they allow you to modify the sound. Why two? They map to two complete sets of parameters – primary (top) on SHIFT TOP and secondary (bottom) on SHIFT BOTTOM, corresponding to the parameters that are written above and below each of the pads. Tap or hold either, then tap an icon pads to choose a parameter to edit.
Once in edit mode, adjust the chosen parameter using the left most column of pads as a slider, or use the encoder to the right of the screen. While in this mode you can play all the pads, except for the pads in the Arrow column (slider). Tap again to return to play mode (LED off).
Preset
Preset Mode Tap or hold, then tap a main pad to select a preset (left 32 pads), pattern (middle 24), or sample (right 8). The sections are labelled at the top. A long press on a sample pad will edit it; on other pads, it will copy the current preset / pattern to it. Press and hold CLEAR to clear the last touched preset or pattern.
Previous
Previous Button Tap to jump to the previous step (sequencer paused) or first step (sequencer playing). Hold it, then tap a main pad to jump to a step within the current loop, or to set a new loop start outside the current loop.
Next
Next Button Tap to jump to the next step.
Hold it, then tap a main pad to set the end of the current loop.
Clear
Clear Button Tap or hold to clear stuff. Useful to mute recorded notes, live, while the sequencer is playing. If recording, this will permanently clear steps. In preset mode, hold this after tapping a main pad to clear whole patterns or re-initialize presets.
Record and Play
Play / Record Buttons Tap to toggle playback and recording. Recording can be step based (when sequencer is paused) or realtime (when sequencer is playing). When you enter a note (or multiple notes, the sequencer is polyphonic) the sequencer jumps to the next step.
Center Pads and LEDs
The pads have two functions. Their primary role is to play notes, in default presets the bottom left pad plays C0. Each pad up is 1 note higher within the selected scale, each string is tuned 7 semitones or a perfect fifth up (but snapped to the closest note in the scale).
The second function of the pads is to select parameters. The left most column acts as a slider to modify parameter values. The right most column refer to the modulators. The center 48 pads each correspond to 2 parameters, which are printed directly above and below the pad. The parameters are described in the Parameters chapter.
Each pad also has a white LED. These LEDs have different behaviours in the various modes:
In Play mode the LEDs light up the notes that are being played, as well as the active sequencer step.
In Preset mode the LED's show the active preset, sequencer pattern and current sample (when in sample mode).
In Parameter mode the LEDs show both the parameter that is being edited and the modulators that have been assigned to that parameter. So when a parameter is changing unexpectedly, you can select the parameter and then the modulator that is causing the cange will also light up.
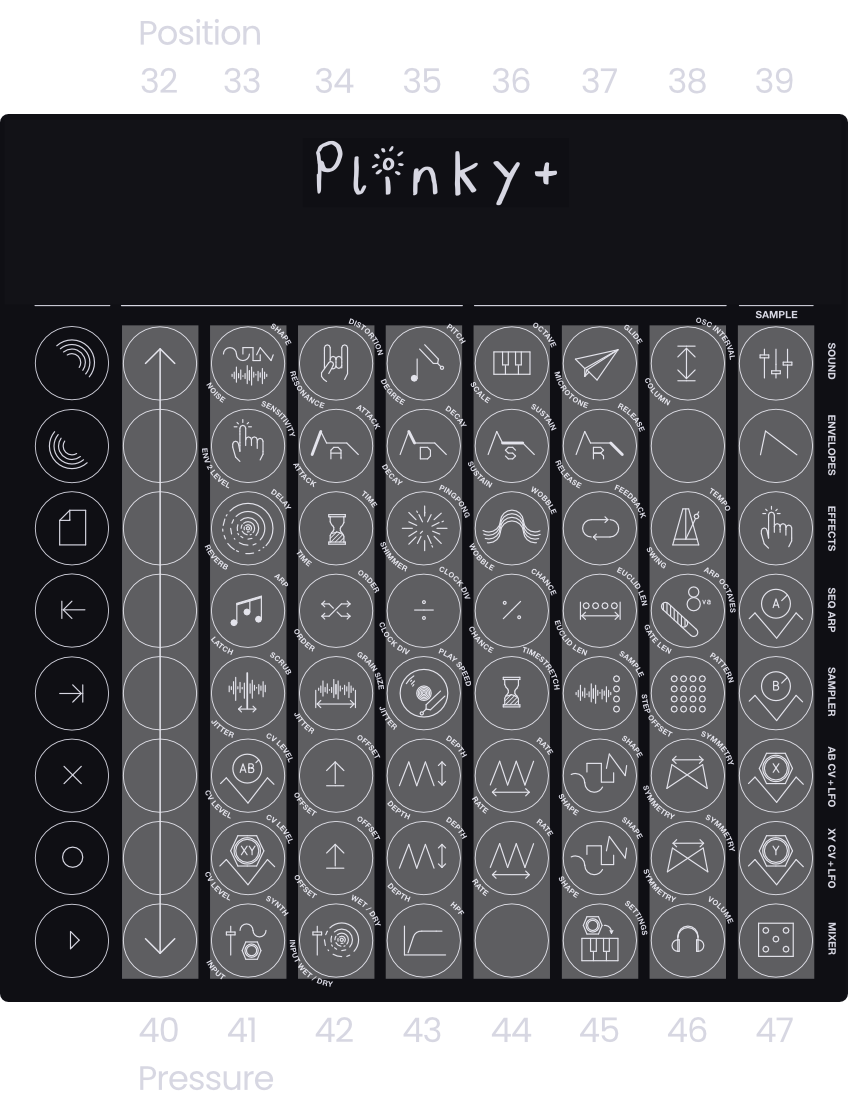
Parameters
Plinky’s parameters are arranged in somewhat logical horizontal rows.
hold tap
Remember to hold SHIFT TOP or SHIFT BOTTOM to enter parameter edit mode, then tap a pad with an icon to select that parameter. The left most column then becomes a dedicated slider, or you can use the encoder right of the screen.
Pressing SHIFT TOP or SHIFT BOTTOM again returns to play mode, with all 64 pads available to play. This is the main workflow when making patches with Plinky.
The Arrow column of pads is a slider. The rightmost column of pads are modulation sources. We’ll cover those later. The middle 6 columns are the parameters themselves. From top to bottom, they are:
Sound (Synthesizer)
Shape
hold tap Controls the shape of the oscillators in Plinky. When exactly 0%, you get 4 sawtooths per voice. When positive, you blend smoothly through 16 ROM wavetable shapes, (2 per voice,) provided by @miunau. When negative, you get PWM control of pulse/square shapes, (also 2 per voice.)
CV and internal modulation only work either positive or negative: you can blend through the wavetables when the parameter is over 0, or you can modulate pulse/square waves when the value is negative. You cant cross through zero.
Plinky pans each set of oscillators, (and the sample grains) a little giving the sound a rich stereo field. With the supersaw, we have 2 oscilators panned left and 2 panned right. With the wavetable and pulse oscilators 1 is panned left and 1 is panned right.
Tip: Honestly, just play with this one for a bit. Assign it to a knob, play an arp or pads and listen to the rich, full scope of sounds Plinky will play. From there on see for yourself. Add an envelope to it, or let pressure modulate the timbre of the sound.
You can find install instructions for a number of alternate wavetables here. The wavetable repo on github also has a python script that lets you convert your own wavetables to Plinky's format. Wavetable files come in the form of WAVETAB.UF2.
Noise
hold tap Each voice can add a variable amount of white noise to the oscillator, before the low-pass gate. Try assigning an envelope to the noise parameter. An envelope with a short attack and decay will give a percussive feel, while longer attack will ‘wash over’ the sound which is more suitable for pads.
Drive
hold tap When turned up high, the saturation unit will create guitar-like tones, especially when playing polyphonically. It can also be used to compensate for changes in volume, for example if the Sensitivity parameter is low.
Resonance
hold tap Each voice has a 2-pole lowpass gate controlled by your finger pressure and the Sensitivity control. This parameter adds resonance to the filter. Note that at high levels of resonance, you may wish to adjust the drive or the high pass filter parameters.
Pitch
hold  tap Use this to (fine) tune Plinky. Range is 1 octave up or down, unquantized. Tip: By default Plinky is tuned to C, so to play in G we could set this value to either 7 or - 5
Degree
hold  tap Think of this as a quantized pitch control, that transposes Plinky in such a way that all the notes stay in the same scale. In other words, it changes which degree of the scale is played, but not the root of the scale itself.
Octave
hold tap Use this to quickly change pitch, quantised to octaves. This is a great parameter to use with Plinky's built-in randomisation feature (Dice pad).
Scale
hold tap Selects which scale of notes Plinky uses.
The following Scales are available:
- Major
- Minor
- Harminoc Min
- Penta Maj
- Penta Min
- Hirajoshi
- Insen
- Iwato
- Minyo
- Fifths
- Triad Maj
- Triad Min
- Dorian
- Phrygian
- Lydian
- Mixolydian
- Aeolian
- Locrian
- Blues Min
- Blues Maj
- Romanian
- Wholetone
- Harmonics
- Hexany
- Just
- Chromatic
Glide
hold tap Controls the speed of the portamento between notes in a single voice. Higher = slower
Microtone
hold tap Controls how much vertical movement of your finger detunes the note. This also thickens the sound through 'unison' detuning of the individual oscillators in each note, so values above 0 are recommended.
Osc Interval
hold  tap Each voice has several oscillators, and this sets a fixed interval between them, from +1 to -1 octaves.
Stride (Column)
hold tap Controls the interval, in semitones, between each column of Plinky. It defaults to 7 semitones, a perfect fifth, like a Cello or Violin. The notes are always snapped to the chosen scale, even if the stride calls for chromatic notes, so Plinky does its best to choose column pitches that follow this stride while staying in-scale.
Videos: Interval, Pitch and Degree
Nathan Plante has made a number of quick tutorials showcasing individual aspects of the Plinky / Plinky+ synth engine for his YouTube channel. Check them out below:
Envelope Generator
Plinky has two Envelope Generators.


Envelope 1 (the upper parameter) is mapped to the Low Pass Gates and has Attack, Decay, Sustain and Release stages.
Envelope 2 (the bottom parameter) is unassigned by default and can be mapped to parameters with the Envelope modulator pad. Like Envelope 1 it is an ADSR envelope. The parameters are on the same pads.
hold tap tap
To assign a parameter to Envelope 2, hold a SHIFT pad, then tap a parameter pad to select it. Now, set the base value of the parameter using the Arrow column or the Encoder.
Still holding down SHIFT, tap the Envelope pad in the righthand MOD SRC column. Again, adjust the modulation depth using the Arrow column or the Encoder.
Sensitivity
hold  tap Overall sensitivity, controlling the mapping of finger pressure to the opening/closing of each voice's low-pass gate. If you are looking for a lowpass cutoff frequency, this is the parameter you want. Adjust the Drive parameter if you need to compensate for changes in volume.
Envelope 2 Level
hold tap Sets the peak level of the second envelope, which can be used as a modulation source. To assign a parameter to Env 2, hold a SHIFT pad, then tap a parameter pad to select it. Still holding down SHIFT, tap the Envelope pad on the right. Adjust depth with the Encoder.
Attack Time 1 and 2
Attack (top) is for the main envelope that controls the lowpass gate. The peak level is set by the pressure of your finger, modulated by the Sensitivity parameter. Attack (bottom) controls the attack time for Envelope 2. The peak level is controlled by ENV 2 Level.
Decay Time 1 and 2
Decay (top) is for the main envelope that controls the decay time for the lowpass gate. Decay (bottom) controls the decay time of Envelope 2.
Sustain Level 1 and 2
Sustain (top) is for the main envelope that controls the sustain level for the lowpass gate. Sustain (bottom) controls the sustain level of Envelope 2.
Release Time 1 and 2
Release (top) is for the main envelope that controls the release time for the lowpass gate. Release (bottom) controls the release time of Envelope 2.
Master Effects


Plinky has 2 send/return effects: a Delay and a Reverb.
They can be added to both the Synth/Sampler outputs and to the audio coming in through one of the input jacks. The parameters in this section apply to the effect parameters. The Send parameter determines how much of the effect is sent to the mixer. In the mixer section you can adjust the dry/wet settings for the effects.
Delay
Delay Send
hold tap Amount of the dry sound sent to the Delay unit.
Turn it up for echoes!
Delay Time
hold tap The time between each echo. Positive values are unquantized; negative values are multiples of the current tempo.
Delay Ratio
hold tap The Delay unit is stereo. This moves the right tap to an earlier time, causing ping-pong poly-rhthmic repeats. Try simple ratios like 33%, 50%, 75%.
Delay Wobble
hold tap Amount of simulated tape speed wobble, causing pitch distortions in the Delay.
Delay Feedback
hold tap Amount of feedback - the volume of each echo reduces by this amount.
Reverb
Reverb Send
hold tap Amount of the dry sound sent to the Reverb unit. Turn it up for Reverb!
Reverb Time
hold tap Controls the length of the decay of the Reverb.
Shimmer
hold tap Amount of octave-up signal that is fed into the Reverb, causing a shimmer effect.
Reverb Wobble
hold tap Amount of simulated tape speed wobble, causing pitch distortions in the Reverb. Avoids metallic artefacts.
Arpeggiator and Sequencer


Plinky has a powerful arpeggiator and sequencer, each with their own quirks.
The Arpeggiator can be latched (when you lift your fingers the last notes / pressure is continued). Besides the obvious clock divisions / multiplications, the arpeggiator can also play Euclidean patterns or random rhythms. Additionally the arp has some interesting order / modes, that allow for even more complex rhythms and/or polyphonic arps.
The Sequencer is polyphonic. The sequencer can also control the arpeggiator: If both are on, the sequencer will play patterns of arps. As both the sequencer and the arpeggiator’s clocks can be divided to up to 256x the clock’s speed, this allows for very long, complex patterns.
Tempo / BPM
hold tap Tempo in BPM. You can also tap this parameter pad rhythmically to set the tempo. It controls the sequencer, arpeggiator and clocked parameters (like echo time for synced Delays) and devices.
Swing
hold tap This parameter is used to add swing.
Latch
hold tap Switches the latch on/off. When on, played notes will sustain even when you take your fingers off Plinky+. Useful for chords, arps, and drones. Switch Latch on and send in V/oct pitch CV and Gate signals if you want to use Plinky+ like a Eurorack oscillator.
Arpeggiator
hold tap Switches the arpeggiator on and off.
Arpeggiator Mode / Order (Top)
hold tap Select the arpeggiator mode.
The following arpeggiator modes are available:
- Up
- Down
- Up then Down
- Up then Down (repeat end notes)
- Up with lowest note pedal
- Down with lowest note pedal
- Up then down with lowest note pedal
- Random
- Random playing 2 notes at a time
- Repeat all notes (polyphonic)
- Up (all 8 columns)
- Down (all 8 columns)
- Up then Down (all 8 columns)
- Random (all 8 columns)
- Random, 2 notes at a time (all 8 columns)
The 'all 8 column' modes include every column, even those without a note, introducing rests into the arpeggio.
Arpeggiator Clock Division
hold tap Sets the speed of the arpeggiator. Negative numbers are unquantized, positive numbers divide a 32nd note clock. The following divisions are available:
- 1/32
- 2/32 = 1/16
- 3/32 = dotted 1/16
- 4/32 = 1/8
- 5/32 = 1/8 + 1/32
- 6/32 = dotted 1/8
- 8/32 = 1/4
- 10/32 = 1/4 + 1/16
- 12/32 = dotted 1/4
- 16/32 = 1/2
- 20/32 = 1/2 + 1/8
- 24/32 = dotted 1/2
- 32/32 = 4/4
- 40/32 = 5/4
- 48/32 = 6/4
- 64/32 = 2 bars
- 80/32 = 2 bars + 1/2
- 96/32 = 3 bars
- 128/32 = 4 bars
- 160/32 = 5 bars
- 192/32 = 6 bars
- 256/32 = 8 bars
Arpeggiator Chance / Density (top)
hold tap Sets the probability of the arpeggiator progressing on each tick of its clock. If the arp length parameter is 0, this is a true random probability, otherwise it's the density of a Euclidean rhythm.
Arpeggiator Euclidean Length (top)
hold tap When non zero, this sets the length of the Euclidean pattern used by the arp. Use the arp probability parameter to change how many notes are included in each pattern. Negative values treat rests differently, try both.
Arpeggiator Octaves
hold tap Sets how many octaves the arpeggiator ranges over. This means that if you only play 1 note, the arp will play as many octaves of that note (upwards) as you have set the parameter to.
Sequencer
Plinky+ has a polyphonic Sequencer. There are two methods you can use to record steps into it:
Step Based
You can record notes step-by-step, when REC is armed and the sequencer is paused:
- Tap REC to arm the Sequencer. The sequence needs to be paused.
- When you enter one note or multiple notes, the sequencer jumps to the next step.
- Disable REC, and hit PLAY to listen back to the sequence you recorded.
Realtime
You can record notes in realtime, when REC is armed and the sequencer is playing:
- Tap REC to arm the Sequencer, then PLAY so the sequence advances.
- Record notes by playing the touch surface while the sequencer advances.
- As long as REC is enabled, you can overdub and add to the existing notes.
- Disable REC, and you can improvise over the sequence without notes being added.
Transport
Tap REC and PLAY in the Shift column to toggle playback and recording. Recording is realtime, when the sequencer is playing, or step based, when the sequencer is paused.
Use the PREV and NEXT pads to jump to a step or set the loop start and length.
Tap PREV to jump to the previous (Seq paused) or first step (Seq playing). Hold, then tap a main pad to jump to a step within the loop or Hold, then tap a main pad outside the loop to set a new loop start point.
Tap NEXT to jump to the next step. Hold, then tap a main pad to set the end of the current loop.
With REC off, tap CLEAR to temporarily mute recorded steps (Seq playing). With REC enabled, tap CLEAR to permanently delete the current step.
Each Sequence is saved into one of 24 Pattern. Hold PRESET, then select which Pattern in the columns labelled PRESET you want to edit. Each Preset can save an individual start and end point, so Preset 1 could play steps 1-8 and Preset 2 steps 9-16 of the first Pattern.
Sequencer Parameters
Sequencer Mode / Order
hold tap Sets the order in which steps are played by the sequencer.
The following options are available:
- Pause
- Forwards
- Backwards
- Pingpong
- Pingpong (repeat end notes)
- Random
Sequencer Clock Division
hold tap Sets the speed of the sequencer. Negative numbers are unquantized, positive numbers divide a 32nd note clock. The following divisions are available:
- 1/32
- 2/32 = 1/16
- 3/32 = dotted 1/16
- 4/32 = 1/8
- 5/32 = 1/8 + 1/32
- 6/32 = dotted 1/8
- 8/32 = 1/4
- 10/32 = 1/4 + 1/16
- 12/32 = dotted 1/4
- 16/32 = 1/2
- 20/32 = 1/2 + 1/8
- 24/32 = dotted 1/2
- 32/32 = 4/4
- 40/32 = 5/4
- 48/32 = 6/4
- 64/32 = 2 bars
- 80/32 = 2 bars + 1/2
- 96/32 = 3 bars
- 128/32 = 4 bars
- 160/32 = 5 bars
- 192/32 = 6 bars
- 256/32 = 8 bars
Sequencer Chance / Density
hold tap Sets the probability of the sequencer progressing on each tick of its clock. If the sequencer length parameter is 0, this is a true random probability, otherwise it's the density of a Euclidean rhythm.
Sequencer Euclidean Length
hold tap When non zero, this sets the length of the Euclidean pattern used by the sequencer. Use the sequencer probability parameter (density bottom) to change how many notes are included in each pattern. Negative values treat rests differently, try both.
Sequencer Gate Length
hold tap Sets the length of the gate of each step. The gate is the signal that determines whether a note is on or off. Longer gates means notes are played longer, which, in tandem with Envelope 1, determines how long notes are sustained.
Video: Sequencer Deep Dive
Nathan Plante has made a great two-part deep dive into sequencing with Plinky and Plinky+.
Nathan makes fantastic music with Plinky on his channel, it's absolutely worth checking out his complete Plinky Playlist. Thank you for the wonderful videos!
Sampler


Plinky's sampler can sample incoming audio from the TRS 3.5 mm audio jack, into 8 slots of 65 seconds each. It lets you record 8 samples, each split into 8 'slices', corresponding to the 8 columns (strings). Once recorded, the bottom row of parameters control the granular playback of your samples.
Record Samples
To record or edit a sample,
tap + select slot from SAMPLE column
hold to clear slot
- Tap PRESET to go into preset mode
- Hold one of 8 pads in the rightmost column, labelled MOD SRC / SAMPLE
- Press and hold REC to record a new sample.
Plinky+ will first have to clear the data stored for that slot which will take a few seconds.
tap either to start recording
tap again to stop recording
- Use Knob A to adjust the recording level.
- Press REC or PLAY to arm for recording.
- Plinky+ will start recording when it hears audio, or tap REC / PLAY again to start recording.
- Tap REC / PLAY any time to stop recording.
Set Slice Points
If you want to set the 8 slice points while recording, tap any of the main pad buttons at the start of each slice. If not, Plinky will cut the sample into 8 equal length slices. You can edit the split points later.
When recording is finished, to audition the slices, press and hold the main pad buttons along the top row. If you slide your finger up and down, it adjusts the start point of each slice.
Modes
There are two options associated with samples, controlled by the 2 parameter shift keys SHIFT TOP / SHIFT BOTTOM: Tape/Pitch mode and Loop mode.
Tap SHIFT BOTTOM to cycle loop mode between 'play slice', 'loop slice', 'play all', 'loop all'.
Tap SHIFT TOP to toggle between Tape mode and Pitch mode.
Tape Mode
Tape mode lays out the sample slices across all 64 pads, top to bottom then left to right, allowing you to quickly play from any point within the sample by pressing the appropriate pad. The pitch of playback is only affected by the 'sample rate' parameter.
Pitch Mode
In Pitch mode, each slice is assigned a base pitch, visible like 'C#3' in the OLED display. You can set this reference pitch for each slice, by turning the encoder.
Now when you perform notes in Plinky, it has set up a multisample key-split and chooses the closest pitched slice to the desired note. Be careful of octaves to be sure to use all your slices. If multiple slices have the same pitch, they will be round-robined.
Press CLEAR to leave sample edit mode.
Sampler Parameters
Scrub
hold tap Controls the starting point of the sample playback, relative to the slice point. If you modulate this parameter you get dynamic slicing.
Scrub Jitter
hold tap Adds an amount of randomness to the sample playback position.
Grain Size
hold tap Sets the size of the grains. Modulate to achieve granular sound effects.
Grain Size Jitter
hold tap Adds an amount of randomness to the sample grain size.
Play Speed
hold tap Determines at what relative speed the sample is played back, eg. 50% slows the sample down by a factor of 2, 200% speeds up the sample twice. Playback speed affects the pitch of the sample accordingly, slowing the sample down pitches it down, speeding up also pitches up.
Play Speed Jitter
hold tap Adds an amount of randomness to the sample playback speed.
Time Stretch
hold tap Determines at what relative speed the sample is played back, but without changing the pitch. As the sample is cut up in miniscule ‘grains’ of audio (milliseconds), Plinky repeats some of these grains to slow down, and leaves some grains out to speed up. Changes in grain size have more drastic effects when samples are stretched severely.
Sample
tap Controls which sample is being played, allowing you to change samples from within a preset by assigning a LFO or CV source to this parameter.
Pattern
hold tap Controls which sequencer pattern is being played back, allowing you to change patterns from within a preset by assigning an LFO or CV source to this parameter. If you add a slow rising saw to this parameter you can chain various patterns together.
Step Offset
hold tap Offsets the starting point of the sequencer pattern allowing for variations in sequencer playback.
Video: Sampler Deep Dive
Nathan Plante has made a great two-part deep dive into sampling with Plinky and Plinky+.
It's absolutely worth checking out Nathan's complete Plinky Playlist on YouTube. Thank you for the wonderful videos!
Modulation A, B, X and Y - LFOs, CV Inputs and Outputs
Row 6 and 7 control the A B and X Y modulators.
hold 


 tap
tap
- CV A SHIFT TOP on the A/B row (pictured)
- CV B SHIFT BOTTOM on the A/B row
- CV X SHIFT TOP on the X/Y row
- CV Y SHIFT BOTTOM on the X/Y row
Each of the rows is arranged so that SHIFT TOP and SHIFT BOTTOM access one of the two CV Inputs.
You can also have CV Outputs, depending on the version of Plinky:
- Plinky you can find them on the 2HP Expander
- Plinky+ build-in on the back panel
These jacks output the A, B, X and Y modulation as CV with a -5V to 5V range.
LFOs and Knobs
Each input also has a dedicated built in LFO that is added on top so that these modulation sources can be useful even without any jacks plugged in. Finally, modulators A and B correspond to knobs A and B, which offset these two values.
Assign Modulation
hold tap tap
To assign a parameter to a modulation source: Hold a SHIFT pad, then tap a parameter pad to select it. Now, set the base value of the parameter using the Arrow column or the Encoder.
Still holding down SHIFT, tap the A B X or Y pad in the righthand MOD SRC column. Again, adjust the modulation depth using the Arrow column or the Encoder.
To remove a parameter's modulation, simply repeat the steps as described above, and turn modulation amount back to 0% (clicking the encoder is perfect for this).
CV Level
 These pads control an attenuator for the signal coming from the A, B, X, or Y CV input jacks. Turn this up if you want to use the incoming CV as modulation, and forward the CV coming in from the jacks to the CV outs (Plinky Expander or Plinky+).
Offset
This parameter offsets the CV and / or LFO. Imagine this as a constant voltage that is being added (or subtracted) from the sum of the A, B, X, or Y CV input and the LFO. Set this parameter to add or subtract a constant voltage from the A, B, X, or Y CV output (Plinky Expander or Plinky+).
Each of the A, B, X, or Y modulators has a built in LFO that is added on top so that the modulation sources can be used without an incoming signal on the front panel jacks.
- Modulators A and B correspond to knobs A and B, which offset these two values.
- Modulators X and Y correspond to the X and Y-axis of the built-in Accelerometer.
To adjust the Accelerometer sensitivity, hold SHIFT DOWN and tap the SETTINGS pad in the MIXER row. Use the Encoder to adjust the senstivity. You can also turn the Accelerometer off completely.
LFO Depth
This parameter acts as an attenuator for the internal LFOs. The default level is zero, so turn this up if you want an LFO for modulation and output it on the A, B, X, or Y CV out. The value of this parameter determines the LFO amplitude on the CV output (Plinky Expander or Plinky+).
LFO Rate
Controls the rate of the internal LFO. The LFO rates can range from milliseconds at +100% to 20 seconds at -100%. Turn this up if you want the LFO for modulation to go faster, or down if you want it to go slower.
LFO Shape
Sets the shape of the LFO.
The following shapes are available:
- Triangle
- Sine
- SmthRnd (Smooth Random)
- StepRnd (Stepped Random)
- BiSquare (Bipolar Square wave, -5v - +5v)
- Square (Unipolar Square wave 0v - +5v)
- Castle (-1 0 1 0 -1 0 1 0, kinda looks like a sandcastle...)
- BiTrigs (Trigger pulses in positive and negative direction)
- Trigs (Trigger Pulses in positive direction)
- Env (a shape with a logarithmic rise and fall)
LFO Symmetry
This parameter sets the slope of the LFO shape - for example turning a triangle wave into a sharp ramp up (symmetry +100) or down (symmetry -100). Set this if you want to tilt the shape of the LFO wave for modulation and on the CV outs (Plinky Expander or Plinky+).
Modulators
After learning about the LFO settings and how to deal with incoming and outgoing CV signals, let's have a look at the Modulation Sources in the rightmost column.
Each of these can be assigned to almost any one of Plinky's paramenters, and change the sound dynamically.
Modulator Base
Toggles between the selected modulator and the base parameter of a device. This way you can set both the base value, and the amount of modulation that is assigned to that parameter.
Envelope 2
An assignable ADSR envelope generator. Set its Attack, Decay, Sustain, Release and peak level with the bottom parameters of the Envelope Generator. Envelope 1 is assigned to the sensitivity by default, but this second ADSR is unassigned by default.
To assign a parameter to Envelope 2, hold a SHIFT pad, then tap a parameter pad to select it. Now, set the base value of the parameter using the Arrow column or the Encoder.
Still holding down SHIFT, tap the Envelope pad in the righthand MOD SRC column. Again, adjust the modulation depth using the Arrow column or the Encoder.
Pressure
Modulate any parameter with the maximum pressure that is applied on each of the strings. Corresponds with the pressure bar in the right of screen.
Modulator A, B, X and Y
These pads assign Modulator A, B, X and Y to parameters. Each of these modulators feature a CV input (which can be attenauted) an LFO with extensive options, and a CV out (Plinky Expander or Plinky+).
- Modulators A and B correspond to knobs A and B, which offset these two values.
- Modulators X and Y correspond to the X and Y-axis of the built-in Accelerometer.
To adjust the Accelerometer sensitivity, hold SHIFT DOWN and tap the SETTINGS pad in the MIXER row. Use the Encoder to adjust the senstivity. You can also turn the Accelerometer off completely.
Random
Assigns (an amount of) randomness to parameters.
TIP: Try to modulate the oscillator octave with randomness to get octave jumps with every press of a pad.
Mixer
Synth
hold  tap Sets the gain level of Plinky's synth / sampler. Above 50% you will start hitting a limiter, which can help to glue patches with wide dynamic range together. You can use this as a volume control if you are taking audio from the left / mono output.
External Input
hold  tap Sets the gain level of the external audio inputs. When both the Eurorack and Line In are used,Plinky mixes the inputs at fixed levels. These inputs are designed to take Line and Eurorack level signals. If you feed it a 'hot' signal, the analog saturation unit in Plinky+ does its thing.
Wet / Dry
hold  tap Sets the balance between the dry signal synth or sampler voice and the wet Reverb and Delay signal. The distortion and saturation is applied directly to the 8 individual voices. 0 is an equal mix of wet and dry signals. 100 is completely wet and -100 is completely dry.
External Input FX
hold tap Sets the balance between the dry signal of the audio inputs and the wet signal passing through the Reverb and Delay units.
High Pass Filter (HPF)
hold  tap After the synth / sampler, external audio and the effects are mixed, they pass through a High Pass Filter. This parameter controls the cutoff frequency.
Pitch CV Settings
hold  tap With this parameter, you set whether the transposition from the Pitch CV input (V/oct) is unquantized, quantized to semitones, or transposed in-scale. 0V (C0) means no transposition. The pitch input is most useful when you turn LATCH on or play a sequence.
Accelerometer
hold tap Attenuator for the Accelerometer. This parameter controls how sensitive Plinky reacts to the accelerometer. The X and Y-axis of the Accelerometer are mapped to MOD SRC X and Y. With this parameter, you set the Accelerometer level sent to X and Y, or turn it off entirely.
Volume
hold tap On Plinky, this paramter digitally sets the level of the final output stage for the headphone out. Turn this up to 11.
On Plinky+, this paramter does nothing, because the output stage is analogue. Use the volume knob to adjust the level instead. If you need to adjust the gain of the sampler / synth voice, hold SHIFT TOP and SYNTH. You can use that in tandem with the Distortion parameter, hold SHIFT TOP and tap DISTORTION, to set how clipped you want Plinky to sound.
Stereo Width
hold tap This parameter sets the stereo width. The setting is applied to the dry synth sound, not to the overall mix. So the effects from the Master Effects section, for example Reverb or Delay with a ping-pong setting, still add extra width even if this parameter is set to 0.
Set MIDI Channels
Plinky sends and listens to MIDI Channel 1 by default. To set the MIDI I/O channels, use the unprinted pad, sixth column in the MIXER row. Please note that this setting is stored with each Preset. This means you can set and recall it individually for each patch.
MIDI Input Channel
hold  tap To change the MIDI Input Channel, hold SHIFT TOP and tap the unprinted pad. Use the Encoder to select the MIDI input channel, ranging from 1 - 16.
MIDI Output Channel
hold tap To change the MIDI Output Channel, hold SHIFT BOTTOM and tap the unprinted pad. Use the Encoder to select the MIDI Output channel, ranging from 1 - 16.
Videos: External Audio, Stereo Width
Here are two short videos by Nathan Plante walking you through using the external input and the stereo width parameter on Plinky / Plinky+. Also check out the Plinky playlist on his YouTube channel.
That's it for the parameters!
It's a bunch of information, but you'll get it quick!
MIDI
Plinky responds to MIDI!
TRS MIDI
On Plinky V3 the MIDI jacks are the leftmost two jacks next to the Audio I/O and the bottom USB port.
- The TRS MIDI input is the leftmost TRS jack. The input accepts TRS MIDI Type A or B.
- The TRS MIDI output is the second TRS jack from the left. The output is TRS MIDI Type A (Korg).
On Plinky+ the MIDI jacks are located on the back panel.
- The TRS MIDI input is located next to the USB jack and can be either Type A or B.
- The TRS MIDI output is next to the power switch and is TRS MIDI Type A (Korg).
On Plinky V1 and V2, you can add TRS MIDI with the 2HP Expander.
The input circuit used on all versions is the LPZW.modules Autocrossover circuit. Thank you Kay!
USB MIDI
If you connect Plinky to a computer with a USB cable, it will create a MIDI Port as plinkysynth. Plinky will then act as an 8-voice synthesizer. It acts as USB a client, so you need to connect it to your computer or another MIDI host to use the port. Plinky has polyphonic MIDI Note Input and Output.
Input
Plinky responds to incoming notes, as well as MIDI Control Changes (CC). These allow you to edit a subset of Plinky's parameters via MIDI in real time. You can play Plinky while MIDI is being sent to it. Plinky will prioritise touch input over MIDI input, so you can jam over a pre-recorded MIDI pattern.
Output
Plinky sends polyphonic aftertouch, as well as pressure and position as MIDI Control Changes (CC) for each of its strings.
Set MIDI Input and Output channels
Plinky sends and listens to MIDI channel 1 by default.
To set the MIDI I/O channels, use the unprinted pad in the bottom row.
hold  tap To change the MIDI input channel, you hold down the shift top button, and while holding it down, select one the unprinted pad. Use the Encoder to select the MIDI input channel, ranging from 1 - 16.
hold tap To change the MIDI output channel, you hold down the shift bottom button, and while holding it down, select one the unprinted pad. Use the Encoder to select the MIDI output channel, ranging from 1 - 16.
This setting is stored with each patch. That means you can set and recall it individually for each preset.
Midi In
Here's a list of all the CC parameters that Plinky listens to.
Oscillator
| CC | Parameter |
|---|---|
| 13 | Shape |
| 4 | Distortion |
| 9 | Pitch |
| 14 | Interval |
| 2 | Noise level |
| 5 | Glide |
| 71 | Resonance |
Arpeggiator
| CC | Parameter |
|---|---|
| 101 | Latch |
| 102 | On/off |
| 103 | Order |
| 104 | Clock division |
| 105 | Chance |
| 106 | Euclid length |
| 107 | Octaves |
Sequencer
| CC | Parameter |
|---|---|
| 108 | Order |
| 109 | Clock division |
| 110 | Chance |
| 111 | Euclid length |
| 11 | Gate length |
| 83 | Pattern |
| 85 | Steps |
Envelope 1
| CC | Parameter |
|---|---|
| 3 | Sensitivity (LPF amount) |
| 73 | Attack |
| 74 | Sustain |
| 75 | Decay |
| 72 | Release |
Envelope 2
| CC | Parameter |
|---|---|
| 19 | Level |
| 20 | Attack |
| 21 | Decay |
| 22 | Sustain |
| 23 | Release |
FX - Delay
| CC | Parameter |
|---|---|
| 94 | Delay send amt |
| 12 | Delay time |
| 112 | Delay pingpong |
| 113 | Delay wobble |
| 95 | Delay feedback amt |
Modulation A B
| CC | Parameter |
|---|---|
| 24 | A Rate |
| 25 | A Depth |
| 26 | A Offset |
| 27 | B Rate |
| 28 | B Depth |
| 29 | B Offset |
Modulation X Y
| CC | Parameter |
|---|---|
| 76 | X Rate |
| 77 | X Depth |
| 78 | X Offset |
| 79 | Y Rate |
| 80 | Y Depth |
| 81 | Y Offset |
FX - Reverb
| CC | Parameter |
|---|---|
| 91 | Reverb send amt |
| 92 | Reverb time |
| 93 | Reverb shimmer |
| 114 | Reverb wobble |
Sampler
| CC | Parameter |
|---|---|
| 15 | Scrub |
| 16 | Grain size |
| 17 | Play speed |
| 18 | Timestretch |
| 82 | Sample |
Sampler Jitter
| CC | Parameter |
|---|---|
| 116 | Jitter position |
| 117 | Jitter grain size |
| 118 | Jitter rate |
Mixer
| CC | Parameter |
|---|---|
| 89 | External In Volume |
| 90 | External In Wet / Dry |
| 31 | HPF amount |
| 7 | Synth Level |
| 8 | Wet / Dry |
Midi out
Plinky's implementation has polyphonic aftertouch.
In addition to that,
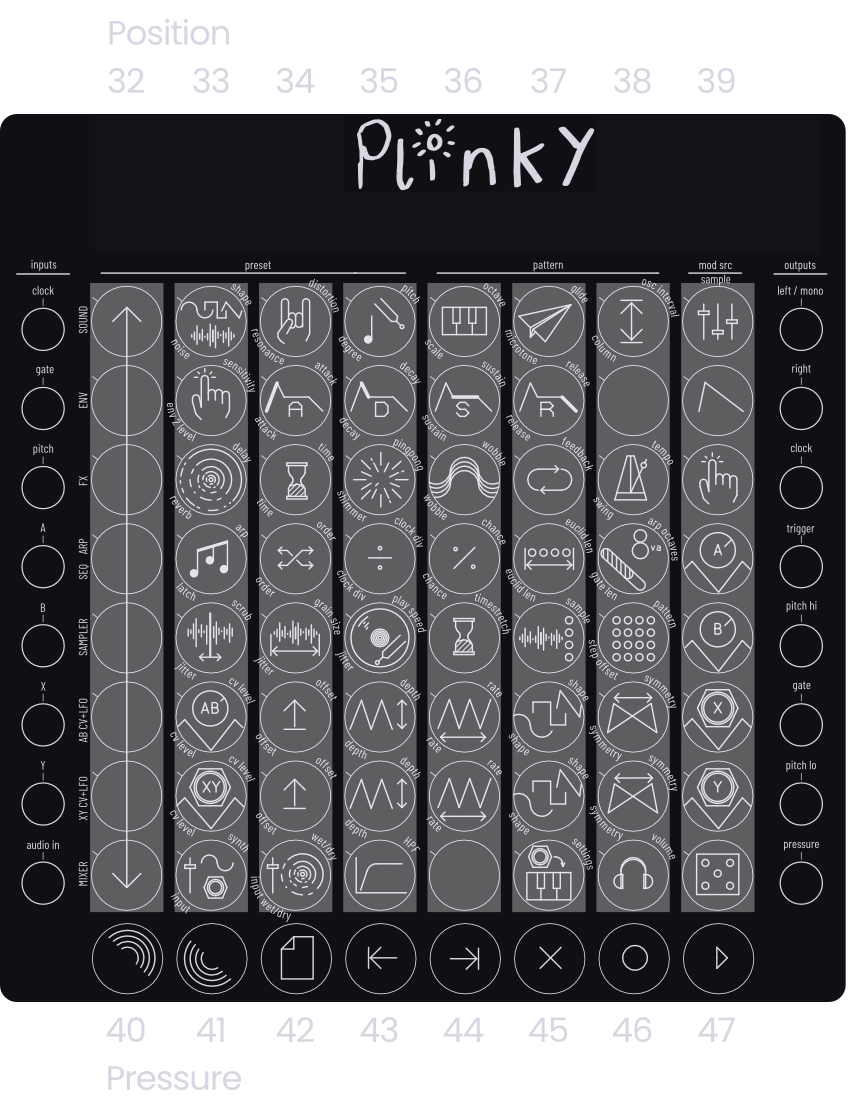
- the finger position for each column is sent on CC 32 - 39,
- and the pressure for each column is sent on CC 40 - 47.
Power
Plinky can be powered over USB. Make sure you do not combine eurorack and USB-power.
Eurorack and CV
Plinky (V2) fits in standard Eurorack rails. It can be powered over Eurorack, but make sure not to combine USB and eurorack power supplies. Plinky has dedicated inputs and outputs to communicate with (semi-)modular gear. Read the description well, because some of the implementations differ slightly from what’s usual in Eurorack (mostly Gate).
Quick Start
Here's how you set Plinky up as an Eurorack oscillator:
tap Select a patch in Preset Mode. Tap the preset pad, then tap a main pad to select a preset (left 32 pads). An initialized patch or Grain Blanc Bank Preset 1 works great in this context. Tap the preset pad again to exit.
hold tap
Enable latch by holding Shift Down and selecting Arp. Set latch to On.
This setting will save with your preset.
Press the lowest pad. you hear a drone.
Using an Eurorack Sequencer or Arturia Keystep as a CV source:
- Patch gate out to gate in on Plinky. The drone goes away.
- Patch V/oct CV out to pitch CV in on Plinky.
Play the sequencer, or play keys on the Arturia Keystep.
The V/oct CV pitches the drone around. Gate opens the lowpass gate.
- with an open gate, tap another pad and your notes will be transposed.
- with an open gate, tap two notes and you can have chords.
Plinky's default preset is not latched by default, but of course you can save them like that. Each time you power cycle your case, you will need to remove the gate cable and press the lowest pad, once, to start the drone.
Eurorack Inputs
Pitch Input
A V/oct CV input for transposing any note played by hand, Arpeggiator or Sequencer. -2V to 5V.
Gate Input
A CV input that scales the openness of all low pass gates. Reads any voltage from 0 to 5V.
A, B, X, Y Inputs
Modulation (A, B, X, Y) CV inputs with a -5V to 5V range, corresponding to row 6 and 7 on the panel.
Clock Input
A 16th note / 4 PPQN clock input. As soon as Plinky receives a clock the Arp / Sequencer will start playing.
Eurorack Outputs
Trigger Output
A trigger out for each note played either by hand, Arpeggiator or Sequencer. 0 to 5V.
Touch Output
A CV signal that outputs the highest amount of pressure that is currently being put on either of the strings. Corresponds to the 'pressure bar' on the right side of the screen. 0 to 5V.
Pitch Hi / Lo Output
V/oct CV out. Hi outputs the pitch of the rightmost column (the highest string) that is currently being played. Lo outputs the pitch of leftmost column (the lowest string) that is currently being played.
Gate Output
A Gate signal. As long as one of the pads is being touched, a 5V signal is generated.
A, B, X, Y Outputs - Expander or Plinky+
These outputs are only available on the Plinky Expander or Plinky+.
One CV output each that sends out the A B X Y modulation as CV with a -5V to 5V range. These correspond to the CV + LFO controls in the sixth and seventh row on the panel.
Clock Output
A 16th note / 4 PPQN clock output, controlled by the BPM parameter.
The Expander
The Plinky Expander is a 2HP module that offers extra functionality when using Plinky in your Eurorack.
It adds four additional CV outputs to connect with the rest of your Eurorack setup, as well as a frontside USB port and TRS MIDI allowing you to access these ports when Plinky is rack mounted.
TRS MIDI Input
Supports both Type A (Korg) and B (Arturia).TRS MIDI Output
Supports Type A (Korg)USB C
Edit patches and interface with MIDI over USB, and update Firmware with Plinky in the rack.
Note that you can not power Plinky from this port.A B X Y Outputs
Output Plinky‘s A B X Y modulation as CV
The 2HP Expander is an updated revision of the classic 4HP DIY Plinky Expander, now available as a factory-built and tested module offering the same features in a more compact form factor.
Safety Instructions
In Compliance with GPSR EU Regulation 2023/988, find the Safety Instructions here.